 |
RumPi Linux Client 1.0
A wxWidgets desktop dashboard that visualizes a RumPi robot's live sensor data as a condition-reactive scene
|
|
RumPi Linux Client 1.0
A wxWidgets desktop dashboard that visualizes a RumPi robot's live sensor data as a condition-reactive scene
|
A wxWidgets desktop dashboard that turns a RumPi robot's live sensor data into a condition-reactive scene.
The client links the headless RumPiLibrary directly, runs its sensor loop on a background thread, and marshals each reading to the UI as a deep-copied snapshot — never shared state. The result is a five-tab window whose Home scene looks like the weather the sensors are describing: it clouds over as the humidity climbs, hazes and browns as the air quality drops, tints warm or cool with the temperature, and streaks with the wind.
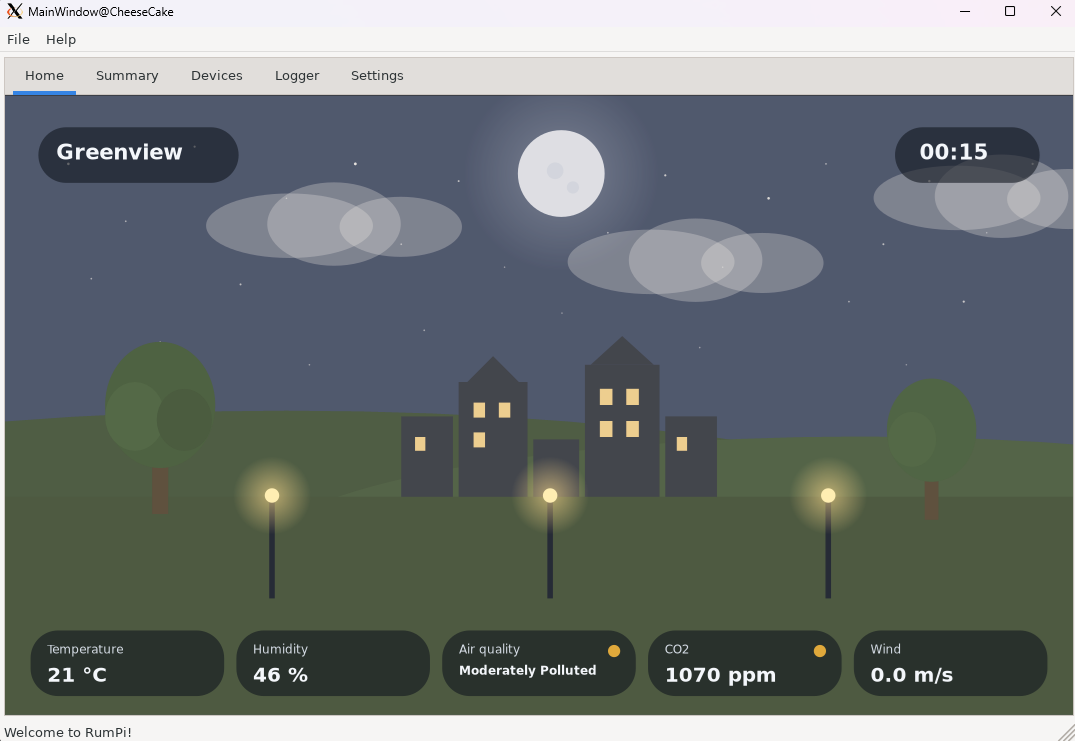
The Home tab running on the robot at 00:15 — a full moon, a scatter of stars, and humidity clouds over the village, with the live readings along the bottom.
Everything in this window is driven by the library's snapshot, refreshed a few times a second:
ClientConfig; the 00:15 clock (top-right) is the local time that drives the backdrop — here it is night, so the sky is dark with a moon and stars.HomeScenePanel paints the sky, moon and stars, village, glowing streetlamps, and ground, then layers the condition overlays on top. The drifting clouds are the humidity overlay (46 % → light cover), and the lamp glow and lit windows come out at night.ClientUtilities::FormatReading (a sensor with no reading shows "N/A"):ClientConfig.RumPiLibrary runs the hardware with no UI dependency; this client is one viewer of it. The two are joined only by a value-typed snapshot, so neither drags the other's dependencies along.wxThreadEvent payload — there is no lock, no shared buffer, and no way for a slow sensor read to stall the window.The worker thread is the only thing that talks to the library. RumPiManagerThread::Entry() initializes RumPi on the worker thread (so every library call stays on that one thread), then loops — fast-sampling the responsive sensors each tick and doing a full refresh on a slower wall-clock cadence. Each full refresh calls RumPi::GetSelectedSensorReadings(), packs the snapshot into a wxEVT_RUMPI_UPDATE event, and posts it to the MainWindow. Because a wxThreadEvent carries its payload by value, the snapshot is deep-copied across the thread boundary — the UI reads its own copy and the worker is free to overwrite its own.
RumPiManagerThread (worker) refreshes the components and calls GetSelectedSensorReadings().wxEVT_RUMPI_UPDATE — a memberwise copy, so nothing is shared.MainWindow::OnRumPiUpdate (UI thread) unpacks it and refreshes the Summary tiles and the Home scene.try/catch, creates or refreshes one Devices tile per named component instance — a bad payload is logged, not fatal.Separately, the library's own AlertManager feeds the Logger tab: LoggerEventForwarder subscribes to it once and re-posts every alert to the UI as a wxEVT_RUMPI_LOGGER_UPDATE, so the worker→UI hop and the subscription both stay out of the view code.
| Tab | What it shows |
|---|---|
| Home | A HomeScenePanel backdrop that reacts to the live conditions (see below). |
| Summary | A three-per-row grid of at-a-glance tiles: temperature, humidity, air quality, PM2.5, TVOC, formaldehyde, CO2, motion, wind, and light. Each shows "N/A" until its sensor reports. |
| Devices | A scrollable grid with one ComponentPanel tile per named component instance (keyed by name, since several components can share a type), each with the component's icon and its raw reading. |
| Logger | A wxDataViewCtrl with icon / time / level / description columns, fed live from the library's alert bus. |
| Settings | Reserved for in-app configuration (currently edited via the config file below). |
HomeScenePanel paints a layered scene and modulates each layer from a reading. Nothing is drawn for a sensor that is absent, so the scene only ever reflects data it actually has:
Every overlay's maximum opacity, the temperature thresholds, and the CO2 indicator colours are read from ClientConfig, so the scene can be tuned — or dialed down for accessibility — without touching code.
ClientConfig is a singleton that loads user-editable settings from ~/rumpi_config.ini (via wxFileConfig) once at startup, seeding a commented default file on first run so there is always something to edit. Missing keys fall back to built-in defaults, so a partial or absent file still launches. It governs:
Alongside the config file, the app uses ~/rumpi_logs for log output and ~/rumpi_images for scene imagery.
The client is modern C++ built on wxWidgets 3.x and links the prebuilt RumPiLibrary (its public headers plus a per-architecture static library). Component icons are compiled in as embedded PNG data and decoded once on demand by ResourceManager, so the binary needs no external image assets to render the Devices grid.
MainWindow** — the tabbed frame and the update handlers; the best place to start.RumPiManagerThread** — the background poll loop and the snapshot hop.HomeScenePanel** — the condition-reactive rendering.A good reading order is RumPiLinuxClient (the app entry point), then MainWindow (the window and its event handlers), then RumPiManagerThread and LoggerEventForwarder (the two bridges to the library) — that quartet is the spine of the client.
The RumPi Linux Client is written and maintained by Eddie O'Hagan.
 1.9.4
1.9.4